|
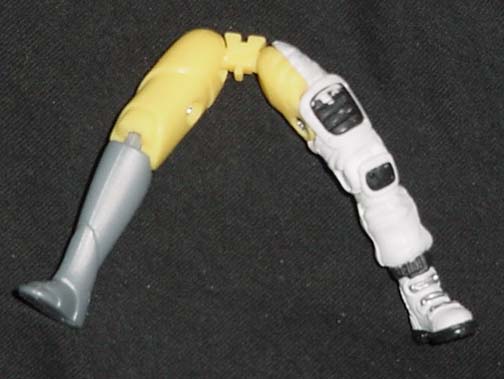
This part isn't something you could show unless there was a video. This part involves the decision to make the piece removable or not. Look at the picture of the knock off figure, the inside leg piece is the part we will need to attach the ball joint. That's where just how much you cut will determine what you do. Let's do an (a) and (b) to say how we do this (a) If you are making your leg piece so it is removable, do note that you will have to replace the joint if you choose this way. I only know one idea for doing that, and we'll get to it. First you will need to make a good determining of the center. Your best to use string and place one end even with the edge of the inner top part of the leg. Extend the string down so that it runs right between the knee joint. Draw a line in a marks on anything type of pencil. Do the same on the back side and this will end up being the point you cut on. From here, line up the area you've already looked over of the leg joint. Start cutting out the joint so that it will fit into the area you've got open. Shave some of the G.I.Joe leg down if you think you need to. Try and keep the screw hole from the knock off figure intact if you feel you need to. Once everything is ready, super glue all of this on. Let the glue dry, then start sculpting in minor details that you want back in. Using an untouched figure to go by is the easiest way to copy detail. You'll start seeing a nice shaped out leg that gives you an idea what you'll end up with at this point. Now attaching the cutting tool to your Dremel, cut along the line (front and back to match) that you have drawn. Be careful around the knee and don't cut the knee. It's at this point you will have to free the peg holding the knee together. The easier way is to cut the full leg so you can bend one side one way and the other side the opposite way. This makes it easier to get at the joint to cut it. Any way you feel comfortable however, use an Exacto blade and cut the joint peg out. You'll have 2 clean sides of the leg much like the original G.I.Joe figures when you take them apart. Clean up any jagged edges, and anything needing to be cleaned around the joint line at the top of the leg should be shaped out. Make sure the ball joint is accessible by the peg joint that fits in too at this point. From there, with ball joint in place, determine the center point where the ball will rest on the other side of the inside leg. Mark it and use a large sized grinding bit to drill a nice groove that matches the ball joint. Keep fitting the leg sides together with ball joint in place until the 2 side meet up. Be careful not to drill all the way through too. Whether you kept the Screw hole or not, you'll need a way to make the 2 sides stay together. If you have kept the screw hole intact, just match up a screw and make threading on the other side. If you didn't keep the screw hole intact, less than 1/2 inches from the leg joint, make a hole. Carve the outer edges so the screw will counter sink when driven in. Either way you take, at this point put the screw in the hole and attach the sides together with the ball joint in place. Repeat with the other leg. Now you need to replace that joint at the knee. The only real way I know to do it is if you can find replacement parts at a craft/hobby store. If not, to make something by hand you will need 2 round pieces of plastic, one larger than the other making sure the larger piece fits into the knee joint hole. Using the end of a knife, or a piece of metal, melt one side so it "mushrooms" out. This will be the outer piece. On the larger piece, carefully drill a hold that's of the same roundness as the smaller plastic piece. Trim both up so they will slide into each other and fit through the knee hole. If you do this just right, it will be tight enough to hold without glue. Apply final touch ups with sanding and detailing. Both legs are now done!
|

|
(b) This way is a lot easier since you don't have to take all the extra steps to clean up and fit things just right. You only need to cut just the area where the ball joint is held on the knock off figure. You need to be sure to match up the plastic as close as you can to the G.I.Joe figure so that you won't have too much to fill in. Once you have the joint roughly ready to be placed on the leg, attach the ball joint and place the piece on so you can see where the ball lines up on the other side. make a mark for the center and use a large sized grinding bit to drill a nice groove that matches the ball joint. Keep fitting the leg sides together with ball joint in place until the 2 side meet up. Be careful not to drill all the way through too. If you find that you are about to drill through the other side of the leg, but still need to drill more out so the sides match up, just add putty to build the leg up on the inside. Get it good enough and fill in the seam later. Once you have successfully made the 2 side meet (or at least good enough), super glue the new piece on. Be careful not to let ANY glue slip into the joint. Take your time! Once the glue has dried, move the leg around a bit so you can see if you messed up and glue the joint, hehe. You'll have to carefully work the leg around to try and loosen the glue if it has. Now you can fill in the seams and open areas with putty. You might even have a large seam around the top area due to the ball joint pushing the piece apart. Fill this in and shape the joint to match. After the putty dries, you can carve in the detail. Using an untouched figure to go by is the easiest way to copy detail. Take your time and you'll have great results. Once you finish the other leg the same way, you're ready to move on!
|